Direct answer: Investment casting (lost-wax) builds precision metal parts through a defined sequence — wax pattern injection, tree assembly, ceramic shell building, dewaxing, molten-metal pouring, knockout, and finishing — achieving tight tolerances and a fine surface finish on complex geometries.
1 Wax Pattern Injection
The process begins with injecting molten wax into a metal die to create a precise replica of the final part. This die is typically made from aluminum or steel and designed with shrinkage allowances.
Key process parameters include:
- Wax temperature (typically 60–80°C) to ensure proper flow
- Injection pressure to fill thin sections and fine details
- Cooling time to prevent distortion during ejection
The quality of the wax pattern directly determines the dimensional accuracy and surface finish of the final casting. Any defects at this stage will carry through the entire process.
2 Pattern Assembly (Treeing)
Individual wax patterns are assembled onto a central wax sprue to form a tree-like structure. This setup allows multiple parts to be cast in a single batch, improving efficiency and yield.
During assembly:
- Patterns are attached using heated tools or wax welding
- Gating and runner systems are designed to ensure smooth metal flow
- Orientation is optimized to minimize turbulence and shrinkage defects
Proper tree design is critical for controlling metal flow and avoiding porosity or misruns.
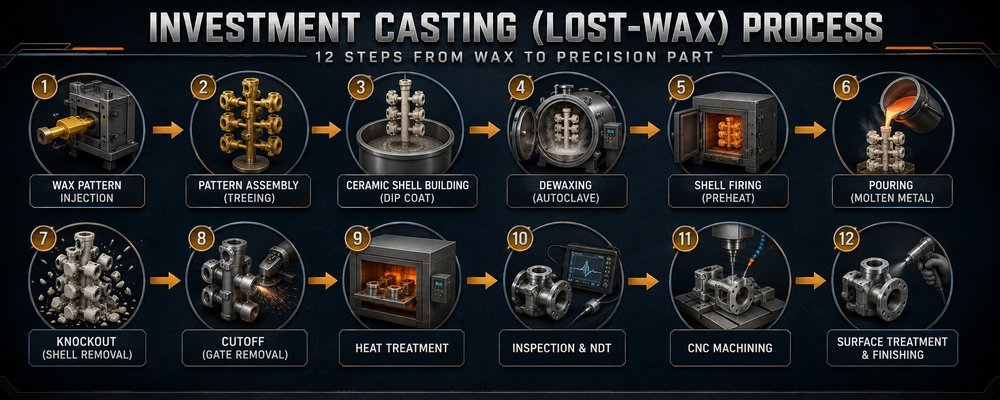
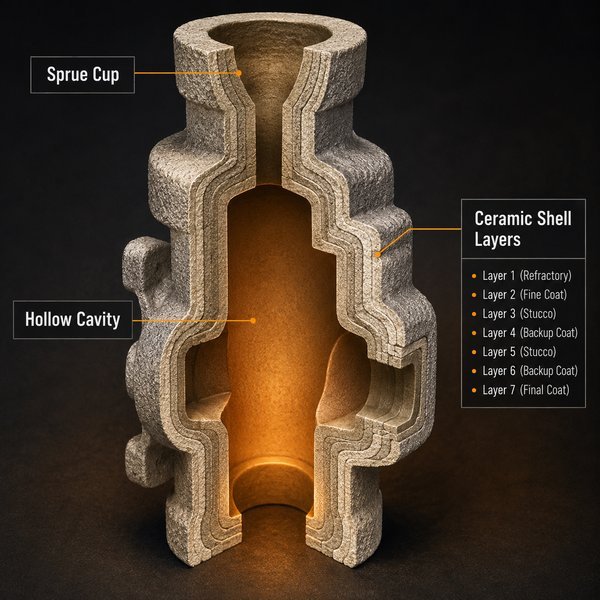
3 Shell Building (Ceramic Dip)
The wax assembly is repeatedly dipped into a ceramic slurry and coated with fine sand (stucco). Each layer is dried before the next is applied.
Typical shell building involves:
- 5 to 8 layers depending on part size and weight
- Initial layers using fine zircon sand for surface quality
- Backup layers using coarser materials for strength
This step creates a strong ceramic shell capable of withstanding high temperatures and molten metal pressure while maintaining fine detail reproduction.
4 Dewaxing (Autoclave)
The ceramic-coated assembly is placed in an autoclave, where high-pressure steam melts and removes the wax. This leaves behind a hollow ceramic mold.
Important aspects:
- Rapid wax removal prevents shell cracking
- Wax can often be recovered and reused
- Internal cavities are preserved with high accuracy
This is where the "lost-wax" concept becomes evident.
5 Shell Firing (Preheating)
After dewaxing, the ceramic shell is fired in a furnace at temperatures between 800°C and 1100°C.
This step serves multiple purposes:
- Burns off residual wax and contaminants
- Sintering strengthens the ceramic shell
- Preheats the mold to reduce thermal shock during pouring
Preheating also improves metal flow and helps achieve better surface finish.
6 Pouring (Casting)
Molten metal is poured into the preheated ceramic shell. The type of metal depends on the application and may include stainless steel, carbon steel, alloy steel, aluminum, or bronze.
Key considerations:
- Pouring temperature must match alloy requirements
- Controlled filling reduces turbulence and air entrapment
- Gravity pouring is most common, though vacuum or inert gas methods may be used for critical parts
Once filled, the metal begins to solidify inside the mold.
7 Knockout (Shell Removal)
After solidification and cooling, the ceramic shell is removed through mechanical vibration, hammering, or high-pressure blasting.
At this stage:
- The metal tree structure is revealed
- Surface residues are cleaned off
- Initial inspection may begin
Care is taken to avoid damaging delicate features during shell removal.
8 Cutoff (Gate Removal)
Individual castings are separated from the central sprue using cutting methods such as:
- Bandsaws
- Abrasive cutting wheels
- Plasma or laser cutting (for larger parts)
The remaining gate marks are then ground smooth to meet dimensional and cosmetic requirements.
9 Heat Treatment
Heat treatment is applied to enhance mechanical properties based on material and application.
Common treatments include:
- Annealing for improved ductility
- Normalizing for uniform grain structure
- Quenching and tempering for strength and toughness
- Solution treatment and aging for stainless steels and superalloys
This step ensures the casting meets performance standards in demanding environments.
10 Inspection & NDT
Quality control is critical in investment casting, especially for industrial and safety-critical components.
Inspection methods include:
- Dimensional inspection using calipers or CMM
- Visual inspection for surface defects
- X-ray (radiographic testing) for internal porosity
- Ultrasonic testing for structural integrity
- Dye penetrant testing for surface cracks
Strict inspection ensures compliance with industry standards such as ASTM, ISO, or customer-specific requirements. Rigorous NDT testing at each stage ensures quality.
11 CNC Machining (If Required)
Although investment casting produces near-net-shape parts, machining is often required for precision features.
Typical machining operations:
- Drilling and tapping threads
- Machining sealing surfaces
- Tight tolerance bores and interfaces
This step ensures critical dimensions meet exact engineering specifications.
12 Surface Treatment & Finishing
Final finishing improves corrosion resistance, appearance, and functional performance.
Common surface treatments:
- Shot blasting for uniform texture
- Acid pickling to remove scale
- Passivation for stainless steel corrosion resistance
- Polishing for aesthetic or functional surfaces
- Powder coating or painting for protection
The finishing process is tailored to the part's application, whether industrial, medical, or decorative.